Unlike with BasisCubes however, no data is physically stored in SAP BW. The data is taken from the source systems only after a query has been executed. There are three types of remote cube. They can be distinguished by the way in which they retrieve data.
Types of Remote cubes:
Virtual Cube Types -SAP RemoteCube
A SAP RemoteCube allows you to define queries with direct access to transaction data in other SAP systems.
-General RemoteCube:
A general Remote Cube allows reporting using data from non-SAP systems. The external system transfers the requested data to the OLAP processor via the BAPI.
-Virtual InfoCube with Services:
For a virtual InfoCube with services, a user-defined function module is used as the data source.
For more information you can go through the link below which will take APO/BW as an example:
https://www.sdn.sap.com/irj/servlet/prt/portal/prtroot/docs/library/uuid/5f229690-0201-0010-84ba-9ee5a8958a05
Monday, 6 October 2008
Monday, 29 September 2008
Information Broadcasting
Purpose
Information broadcasting allows you to make objects with Business Intelligence content available to a wide spectrum of users, according to your own requirements.
Notes on Implementation
The documentation on information broadcasting is structured according the requirements of users so that you are provided with role-specific guides to support you in performing tasks. For example, if you belong to the implementation team, you require the installation guide and the configuration guide. As a system administrator, the administration guide is available.
Before users can use information broadcasting, you have to install the necessary components (installation guide), make the necessary configuration settings (configuration guides), consider security recommendations (security guide), and make the necessary settings in system administration (administration guide).
Configurations and Settings
Information Broadcasting (Click Here)Pre-Calculation Service (Click Here)
Thursday, 21 August 2008
SAPConnect (SCOT)
if u want to be able to distribute Business Intelligence content by e-mail, set up the mail server on the application server. Choose node SMTP (Simple Mail Transfer Protocol) under SAPConnect: Administration (transaction SCOT). For more information, see the SAP Reference IMG ® SAP Customizing Implementation ® SAP NetWeaver ® Business Intelligence ® Settings for Reporting and Analysis ® Settings for Information Broadcasting ® Set Up Mail Server and ![]() SAPconnect (BC-SRV-COM).
SAPconnect (BC-SRV-COM).

Tuesday, 15 July 2008
Creating Archiving Objects
The archiving object is a central component of SAP Data Archiving. The archiving object specifies precisely which data is archived and how. It describes which database objects must be handled together as a single business object. and interprets the data irrespective of the technical specifications at the time of archiving
To archive data from InfoProviders, you first need to create an archiving object for the InfoProvider. InfoCubes and ODS objects usually contain one of the closed datasets for a specific business area. Therefore, an archiving object is created for each InfoProvider. Only one archiving object can be created for each InfoProvider.
First of all, maintain the metadata of the archiving object in the InfoProvider. The actual object is not generated until the InfoProvider is activated.
You can also create the archiving object afterwards for an InfoProvider that already exists and is filled with data.
Procedure
- Call transaction AOBJ.
- Choose New Entries and enter the following data:
- General Information
- Object Name
Name of the archiving object
- Text
Short description - Application Area
Organizational category for assigning archive files - Application Component
Used for assigning archive files
- Programs and Functions
- Write Program
Name of the program that writes the archive files
- Interruption Possible
Setting this indicator means the archiving object supports Interruption and Continuation of an Archiving Session. If you set this, the write program must also handle the interruption request. This indicator must not be set if the Do Not Start Before End of Write Phase is set.
- Delete Program
Name of the program that deletes the data from the database after the write program has finished - Do Not Start Before End of Write Phase
If this indicator is set, the delete programs do not start until the write program is finished. To actually start the delete phase immediately, the Start automatic. indicator must be set in archiving-object-specific Customizing.

This indicator should not be set for most archiving objects. Before you set this indicator, decide whether you actually need to use this indicator or can do without it.
- Reload Program (optional)
Name of the program with which the data can be loaded from the archive back into the database.
- Prohibit New Session During Reload
If this indicator is set, no new archiving session is generated when reloading archiving sessions. The reload program is not authorized to call the function module ARCHIVE_SAVE_OBJECT.
- Preprocessing Program (optional)
Name of the program with which data is to be prepared for data archiving. - Postprocessing Program (optional)
Name of the program with which data is to be processed after it has been archived. If, for example, the data is only marked for deletion in the delete program, the actual deletion can be executed in the postprocessing program. - Index Build Program
Name of the program for building indexes
- ArchiveSelect.Active
If this indicator is set, the Archive Selection pushbutton is displayed in transaction SARA for building and deleting indexes. If you select archive files using variants, do not set this indicator.
- Index Delete Program
Name of the program for deleting indexes
- Index Build Allowed
If this indicator is set, an index can be created for this archiving object. For more information, see Creating ADK Indexes and Using Them to Access Archive. The actual index creation can be controlled by a Customizing entry.
- "Invalid" Indicator Cannot Be Revoked
If this indicator is set, the "Invalid" indicator for archiving sessions cannot be reset in archive management once it is set.
- Archiving Object Generated
Indicates the archiving object was generated.
As of SAP Web Application Server 6.10 write and delete programs can no longer be generated at runtime.
- Cross-Client
Archiving is client-independent.
- End Dialog
Dialog mode must stop before archiving can begin. Only set this if collisions may occur during data archiving. In general, this should not be set as it was primarily designed for older archiving objects where parallel operation was not able to be guaranteed between online operation and data archiving.
- Documentation
- Info for Write Program
Name of the document containing information about the object-specific write program
- Info for Delete Program
Name of the document containing information about the object-specific delete program. - Info for Reload Program
Name of the document containing information about the object-specific reload program.
- Info for Preprocess Prog
Name of the document containing information about the object-specific preprocessing program. - Info for Postproc Prog
Name of the document containing information about the object-specific postprocessing program. - Info for Read Program
Name of the document containing information about the object-specific read program.
You create the documents using the documentation maintenance transaction (SE61).
- Save your entries and return to the initial screen of transaction AOBJ.
Result
Your new archiving object is included in the list of archiving objects in the system. You can now create additional information about your archiving object by selecting the line and choosing one of the actions under Archiving Object.
Thursday, 3 July 2008
Custom Transaction codes
If we develop some Module pool programs or Report Programs, to make these programs available to the end users. we create transaction codes for these programes."se93" is the transaction where one can create his own custom Transaction codes.
 Custom Tcodes will start with Y* or Z*.
For performing any kind of task in the SAP R/3 or BW system, a transaction is used. SAP provides a standard set of transactions to manipulate i.e insert, update, delete and display data in the system. But sometimes, the need to create a customer specific transaction may arise due to the following reasons
--> Standard SAP may not support that task
--> A particular transaction needs to be customized to suit the customer requirements
A transaction is defined as a sequence of dynpros (sap term for screens) having input and output fields and corresponding processing logic behind them to perform a particular task.
 We call an execution of an ABAP program using a transaction code a transaction . There are dialog , report, parameter, variant, and - as of Release 6.10 - OO transactions. A transaction is started by entering the transaction code in the input field on the standard toolbar or by means of the ABAP statements CALL TRANSACTION or LEAVE TO TRANSACTION. Transaction codes can also be linked to screen elements or menu entries. Selecting such an element will start the transaction.
Wednesday, 11 June 2008
Roles and authorizations
Now and then you bump into the subject roles and authorization while working with SAP. Even if it is a solution to a note, a part of an installation guide, or just a error message that says you don’t got the right authorization to commit a transaction.That’s why I have created this blog to help you out creating simple authorizations.
The transaction is PFCG, and the job is done here.Lets say you run into this note: 128105 and you see that you have to add the following authorizations: Authorizations
The following authorizations are required for frontend printing:-
Device authorization for the object S_SPO_DEV- Device authorization for device '%LOC' for the object S_SPO_DEV- Authorization for the object S_RFC:RFC_TYPE 'FUGR'RFC_NAME 'LPRF'ACTVT 16
In this blog, I will create a new single role, add the authorizations above and then add it to a composite role. You could search up an existing role, and add the authorization to that, but I want to take it from the beginning.Start by entering the transaction PFCG and create a new single role. Before entering a name to the role, you might want to set up a prefix for roles. Ask your technical leader for which prefix you should use. If you don’t have it, you could use this:Z_... )Type of role = Single Contry = NO (If you got several countries)Module = ERP (If you got several systems)Function = PrinterAuthorization = 00 = read, 01, write …
 According to the note we follow, there are two authorizations object; S_SPO_DEV and S_RFC.
 If you don’t know what to add, you can doubleclick on the technical name (S_RFC or S_SPO_DEV) to read more about them.But it says in the note what the values should be, so we start adding it.
7) Doubleclick in the white fields and add the values.
The transaction is PFCG, and the job is done here.Lets say you run into this note: 128105 and you see that you have to add the following authorizations: Authorizations
The following authorizations are required for frontend printing:-
Device authorization for the object S_SPO_DEV- Device authorization for device '%LOC' for the object S_SPO_DEV- Authorization for the object S_RFC:RFC_TYPE 'FUGR'RFC_NAME 'LPRF'ACTVT 16
In this blog, I will create a new single role, add the authorizations above and then add it to a composite role. You could search up an existing role, and add the authorization to that, but I want to take it from the beginning.Start by entering the transaction PFCG and create a new single role. Before entering a name to the role, you might want to set up a prefix for roles. Ask your technical leader for which prefix you should use. If you don’t have it, you could use this:Z
1) Enter the name of the single role and press new single role:

2) Add a good description. Long text is optional.

Note: If you want to add a transaction, then press Menu and add it. According to the transaction, the necessary authorization objects are listed automatically in the Authorizations tab. This example we just want to add authorizations, so we go right on this.
3) Press the icon right to Profile Name, change the T to a Z and press Change Authorization Data

Now you get to the screen where you add the authorizations.
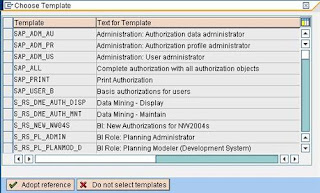
4) Select the Do not select templates
According to the note we follow, there are two authorizations object; S_SPO_DEV and S_RFC.5) Press Manually and the authorizations object.
 After adding the authorization, you can now edit them by changing the properties.
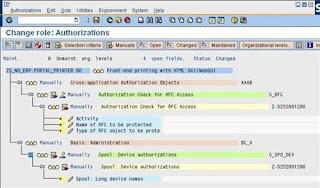
6) First, turn on Technical Names from the Utilities in the menu.
If you don’t know what to add, you can doubleclick on the technical name (S_RFC or S_SPO_DEV) to read more about them.But it says in the note what the values should be, so we start adding it. 7) Doubleclick in the white fields and add the values.
 When it is all done and green, save the role and press the Generate Profile button.
Now the authorization should be ready, and you could add it to the end-users.You may want to add the single role to a composite role. A composite role can contain several single roles. Printing authorizations is a common authorization you want to add maybe to all the end users, but it might be several authorizations an end users should have. I create a new composite role called ZC_NO_ERP.COMMON.00 and add the previous single role.
8) Go back to the transaction PFCG and create a Composite Role
 9) Add a description
 You can now create several single roles and add it to this Composite Role.
10) Goto Roles and add the Single Role you created earlier.
 Save the role and add the composite role to the end-users.
I hope this example / exercise was helpful, if not please give me comments and feedback of how I can improve.
Orginally posted by
Kristoffer Engh
Company: SAP Norway
Company URL: http://www.sap.com
Relation to SAP: SAP Employee
Member in: SAP Developer Network
Tuesday, 12 February 2008
Restarting a process chain at a failed step/request
Sometimes, it doesn't help to just set a request to green status in order to run the process chain from that failed step on to the end.You need to set the failed request/step to green in the database as well as you need to raise the event that will force the process chain to run to the end from the next request/step on. Therefore you need to open the messages of a failed step by right clicking on it and selecting 'display messages'.In the opened pop-up, click on the tab 'Chain'. In a parallel session goto transaction se16 for table rspcprocesslog and display the entries with the following selections:
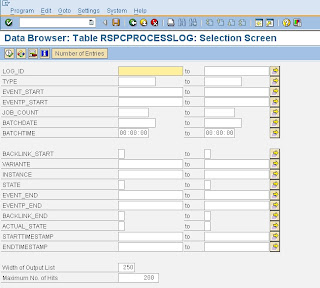
1. copy the variant from the popup to the variante of table rspcprocesslog
2. copy the instance from the popup to the instance of table rspcprocesslog
3. copy the start date from the popup to the batchdate of table rspcprocesslog Press F8 to display the entries of table rspcprocesslog.
Now open another session and goto transaction se37. Enter RSPC_PROCESS_FINISH as the name of the function module and run the fm in test mode.
 Now copy the entries of table rspcprocesslog to the input parameters of the function module like described as follows:
1. rspcprocesslog-log_id -> i_logid
2. rspcprocesslog-type -> i_type
3. rspcprocesslog-variante -> i_variant
4. rspcprocesslog-instance -> i_instance
5. enter 'G' for parameter i_state (sets the status to green).
Now press F8 to run the fm. Now the actual process will be set to green and the following process in the chain will be started and the chain can run to the end.
Of course you can also set the state of a specific step in the chain to any other possible value like 'R' = ended with errors, 'F' = finished, 'X' = cancelled ....
orginal link "Siegfried Szameitat"
1. copy the variant from the popup to the variante of table rspcprocesslog
2. copy the instance from the popup to the instance of table rspcprocesslog
3. copy the start date from the popup to the batchdate of table rspcprocesslog Press F8 to display the entries of table rspcprocesslog.
Now open another session and goto transaction se37. Enter RSPC_PROCESS_FINISH as the name of the function module and run the fm in test mode.
Now copy the entries of table rspcprocesslog to the input parameters of the function module like described as follows: 1. rspcprocesslog-log_id -> i_logid
2. rspcprocesslog-type -> i_type
3. rspcprocesslog-variante -> i_variant
4. rspcprocesslog-instance -> i_instance
5. enter 'G' for parameter i_state (sets the status to green).
Now press F8 to run the fm. Now the actual process will be set to green and the following process in the chain will be started and the chain can run to the end.
Of course you can also set the state of a specific step in the chain to any other possible value like 'R' = ended with errors, 'F' = finished, 'X' = cancelled ....
Subscribe to:
Posts (Atom)